Thursday, December 28, 2017

Walnut Table Top

Walnut is a lovely wood that is a pleasure to work with. Where the caveat lies in finding enough matching boards for a project. The variation of colors in walnut can vary wildly from tree to tree.  Here we see 5 boards and at least 3 different shades of walnut. I was trying my best to save the client some money and use lumber I already had in stock but… I’m good but not magic.


 I had to head to my lumber dealer and search through his stock to find something that would match. The biggest board I had in stock has some reddish tinge to it so that’s what I looked for. It took a while but I found a real beauty that ended up being 
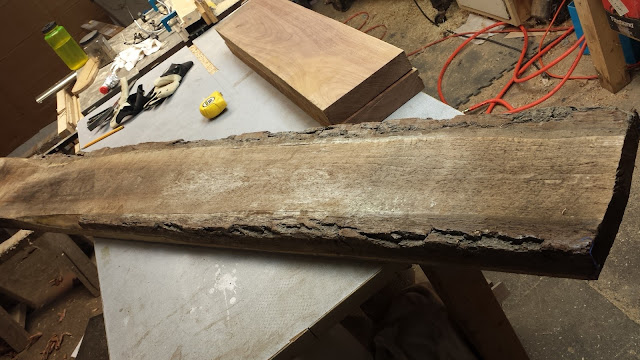
perfect for the job. When I picked it I was planning on cutting off the bark but, once I got it home and measured everything, it turned out that I needed to make use of the entire board. I went ahead and peeled the bark off and realized that it had a really nice natural edge. I’ve never worked with live edge but after checking that it was OK with the client, I went for it. 


I mostly skipped taking pictures of the prep work on the main field of the table. It’s pretty boring stuff. I resawed the big board that I started with to make 4 nice 1x6x34 boards. Resawing is when you set the board up on its narrow edge and slice it into 2 thinner boards. I used my trusty old Delta bandsaw that restored real-time right here on this blog. I really love that saw. 


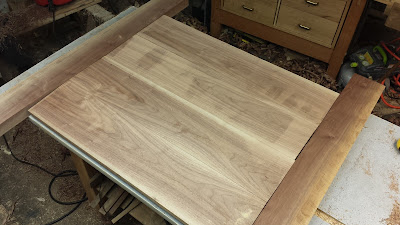
Here's the results of the resawing. You'll notice that the two boards at the bottom of the picture are a nice book match but the others are two different boards. And you can clearly see that one of the breadboard ends is another board again. The way I tried to work it out is a border of darker boards with the center field being lighter stuff. You can see it in the following picture.


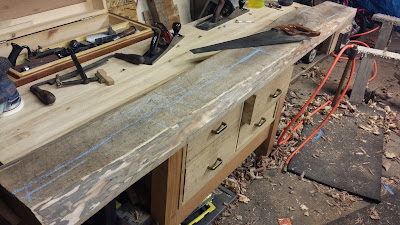
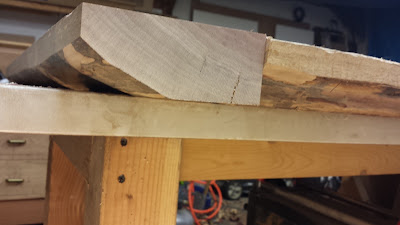
Now here's a shot of the natural edge. I'll have to carefully trim one of the boards to try for a nice, smooth transition.


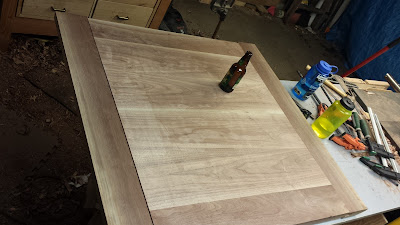
Time for glue-up!  After jointing the edges of all the pieces I threw some biscuits in for alignment and glued up. It was a pretty stress-free glue-up. The one thing you have to watch out for on a bigger panel like this is that the clamps aren't bowing it up or down. If it does start to happen, you can just push the panel flat with some shims between the clamp and the pane.


    After squaring up the panel I cut the joinery for the breadboard ends and install the 4 boards around the outside and a clean up with my trusty old jack plane. This one dates from the 1880's.


The clients have a base they want to use for this tabletop. It came with a glass top that they're sick of so I had to figure out to attach this top to that base. My solution was threaded inserts. There are very simple drill attachments that install these handy little inserts but I don't have one. I had to get creative to get them in but it was nothing that I couldn't overcome. 


On to the finish booth and installation


Monday, May 22, 2017

Storage for the mudroom

It's been a long time comming but now that we have 2 kids worth of shoes, boots, coat, and god knows what else, its time for a serious storage and organization solution in the back mudroom. Taking some inspiration from cabinets I made while at a cabinet shop, I decided on a bench with big drawers underneath and some lockers and small cubbies above. When its all said and done there will be more room and more ways to conceal the mess. I had some 5/4 Ash that had been sitting around for a few years now that was perfect for the bench seat but I needed to pick up some more for the face frame and drawer fronts.


Casework
boards for the bench seat

Its been a few years since I built any cabinets this big so I was a little rusty at first. After a couple missteps I got on track and finished the bench.


Next was the upper locker section. The joinery was a little tricky on the table saw with a dado blade since some of the pieces were so long. I managed and got everthing dry fit. Next is the face frame and back.


Drawers

As I said, its been awhile since I did a project this size and I forgot how much work goes into making drawers. It'd be a breeze if all my lumber was nice 3/4 S4S but I always start with rough lumber. In this case I had some 6/4 maple that I resawed in half on the bandsaw and planed down to 5/8 for the drawer boxes. For the drawer fronts I had enough leftovers from the face frame to make rails and stiles. I have some 8/4 ash that I resawed and planed down to 1/4. The planer and bandsaw got a good workout for this part of the project.
The results of a resawing session


All the parts for the drawer boxes and fronts


A crude mockup of a drawer front

Drawer Fronts
 I went with a simple stub tennon for joinery on the drawer fronts and a 3/8in thick flat panel. It worked well to resaw some 1/2 pieces off the 8/4 ash and bookmatch them for the panel. To fit the panels into the groves I decided against the 'easy' method of using a dado blade and instead went with a 'new to me' rabbet plane. I thought since these were drawer fronts and the back of the panel will be mostly hidden, why not try out a new tool. I did enjoy using it and it worked as it should have. Two points I realized thought is that the nicker needs to be sharpened and while it's not exclusively a single direction plane, redoing the fence and depth gague isn't really easy. It just means that sometimes you end up planing against the grain. The other problem I was was workholding such a thin pieces in a way that didn't impede the plane. 


Joinery for Drawers

Up next is the drawers. A couple of things about these drawers is that I resawed and milled all the stock from 6/4 material and they are 12 in deep. These two facts made it take a long time to put together 3 measly drawers. The first half of the material was 6in wide so I just had to resaw and glue up the panel. The second half was made from 4.5in wide stock and meant I needed to glue up 3 pieces per panel. I could have made life easier if I would have used some of the wider birch I have but the big stff is all 'Red Birch' and I thought drawers boxes just won't be a wise use of such nice stock. So needless to say my band saw and planer got a good workout on this part of the project. Its been quite a while since I used my dovetail jig so it took me at least 45 minutes to get it dialed in before I could get to work. Here's a great tip for everyone to remember - Make test cuts to dial in your setup. I guarantee you'll never regret it. There's no need to comment on the obvious problem in this picture. I didn't trim my test boards to a width that made for clean dovetails on the ends but I did make the necessary steps to do so on the finished drawer parts.


As you can see I still have plenty of material left on my test boards so while it took me a while to get things dialed in, I didn't have to do too many tests before I could get on with it. 

These big drawers almost max out the capicity of the jig!


It's all too often the case that a user manual or instructions  are very ineffective. The manual that comes with the PC jig is an exception. It has nice clear instructions and pictures along with some good tips to make things go smoother. I'm a fan.


Next up is spraying finish. I both dread it and look forward to it. I'm excited because it'll be the first real chance to use my HVLP setup that I got a over a year ago. It was an incredible Craigslist find. I'll give some details in the next post.


Tuesday, May 16, 2017

Introduction to Hand Planes resources

Learning about hand planes can have a pretty steep learning curve. That's why its so important to get that vital, hands-on practice during class. The resources included here should provide you with a basic introduction to the parts of a plane and how they work. They will help reinforce what you learned in class and help you go a little deeper into the craft. If you have questions about anything hand plane related or are looking for some small project lumber, Please reach out by leaving a comment below. 


Old fashioned resources 
For those of you who prefer to read, the link below takes you to a Google drive page with a handful of articles from various woodworking magazines. 


New fashioned resources 
Videos are a powerful tool for learning. I've selected these videos based on a few factors that make it easy for a beginner to understand. If these don't quite 'speak' to you, please browse around YouTube for something else. There is no shortage of hand plane videos. 


Educational Video on “Influence of the Cap-iron on Hand Plane” from giant Cypress on Vimeo.


Other useful resources
Links to modern day plane makers

Lie Nielsen 

Veritas/Lee Valley

Wood River

The Superior Works: Patrick's Blood and Gore - Don't let the name fool you. This is the most exhaustive site on the web when it comes to information about every plane Stanely ever made.

Woodnet.net is my favorite online forum for all things woodworking. It's also a good place to find quality used tools at a fair price.