 |
| Every big job has humble beginnings |
 |
| Count them, 1,2,3 layers and that nasty tar adhesive. |

 |
| YIKES... What a mess!!! |
 |
| A miserable job done!! |
Up comes the the Maple
Tearing up the maple tongue and groove is a task that I won't soon forget. It didn't technically give me carpal tunnel but it sure made me sure I had it. After a day of hammering that prybar I couldn't make a fist the next morning. The pain and swelling was incredible. It was a tough job but it did come up reasonably well. You can see that I only had to replace one rotten floor board in front of the door. The boards under the sink were in perfect shape, surprise.


The pantry
One of the major motivations for this whole project was the pantry, and specifically the temperature of the pantry. I would keep my beer in bottom cupboard in there so it wouldn't take up space in the fridge and all winter long it kept cold enough to drink. There were instances where it even got slushy once you opened it. We had potatoes freeze down there too. So needless to say we had an incredible heat sink that kept floor unbearable, the kitchen cold, and the whole main floor cool. Once I started tearing into the walls and floor it became painfully obvious what the problems were. First of all the cellulose was packed in the walls so tight that it didn't even fall out when I tore the walls off and the floor didn't have any insulation in them at all. It just seemed like there was some sandy gravel or something in there. I tore the outside-facing walls and floor out, sprayed some icynene spray foam insulation and sheetrocked things back up. I used to work for an outfit that did the sprayfoam so that was a really nice score. I burned up some of the lathe and wall boards in the yard and talk about some dry wood. I thought the neighbors would call the fire dept for sure. It was incredibly bright and hot and fast burning.


 |
| Oh My GOD!!!! I though the Fire Dept would be here for sure!!! |


On to the Floor
I had to replace one rotten board just inside the door. No big deal, and I was really surprised not to find any damage under the sink. Because the end of the kitchen by the pantry and the back door was freezing cold all winter I knew I needed to do a little something extra for insulation on the floor. When I say cold I mean it too. We used to keep our beer in a cabinet on the floor in the pantry and it was always ice cold. The first layer to go down was some insulation stuff with foil sandwiched between two layers of special foam that is flexible but not very compressible. Its actually meant to go over the dirt in a heated slab application.

The next step was to put down the backer board for the floor heating elements and tile. Here again I wanted to do something extra on the cold end of the room so I found some insulated backer board. It was expensive and I had to drive to Minneapolis to pick it up but there's no longer a hint of cold to the floor so I guess it was worth it. I think the brand name is hardiboard. Its just rigid foam sandwiched between thin layers of cement. I had to be very careful screwing it down because the screws easily popped through, even easier that drywall. I just used standard backerboard for the rest of the floor.

You can easily see the two different kinds of backerboard here. At this point I've obviously got all the backerboard installed and have begun on the heated floor. The three strips are clips for the heating element. I was really nervous about doing this floor. It was a lot of money and you better hope everything works because in the end its buried under about an inch of mortar and tile.

I didn't cover the entire area of the floor with heating elements because it makes no sense to heat under the cabinets and appliances. Doing this cuts down on work, sq/ft, and cost. The next step is to totally embed all the element in mortar.

I could hardly believe how much mortar this took. Six bags I think!! As you can see I had to do it in a couple shifts. Then it took a few days to dry. That was alright because at this point I needed to start getting the woodshop ready for cabinet construction.
Once the mortar was finally dry it was time for the tile. We himed and hawed about what tile to use and decided to go with 18in square. It was the pattern we liked most and decided it was a big enough room that the larger tiles would look good. The tiling was pretty straightforward. The only catch was deciding how to transition into the pantry.


Now came the moment of truth... turning on the floor. This picture says it all. It was a fantastic feeling.

Building the Cabinets
The cabinets are all maple and plywood. Cope and stick for all the drawers and doors with 1/4in ply panels and carcasses are all 5/8 or 3/4 A/B plywood. I designed and custom fit everything to fit our needs and to use the space most efficiently. We discussed a few different design options and decided that keeping it simple was the best idea. I got a little carried away looking at the home center brochures and the wife brought me back to reality.
The obvious first place to start was with the sink counter so we could get some running water back on the main floor.


I painted the inside of all the cabinets with a heavy coat of primer and then some high gloss kitchen paint. It's held up very well so far. After the carcasses were build it was time to move on to the face frames. They are all solid maple fastened together with pocket hole screws. The are also fastened to the carcass with pocket hole screws.


The doors and drawers come next and man were they a lot of work. I used s3s lumber for everything so it was a multi-step process. Joint, straight line rip, joint again, rip cut to final width, joint again, and finally router table. If I would have had a better table saw there would have been lots less jointing but sometimes you just have to work with what you've got. I went with a simple profile for the cope and stick router bits.

 |
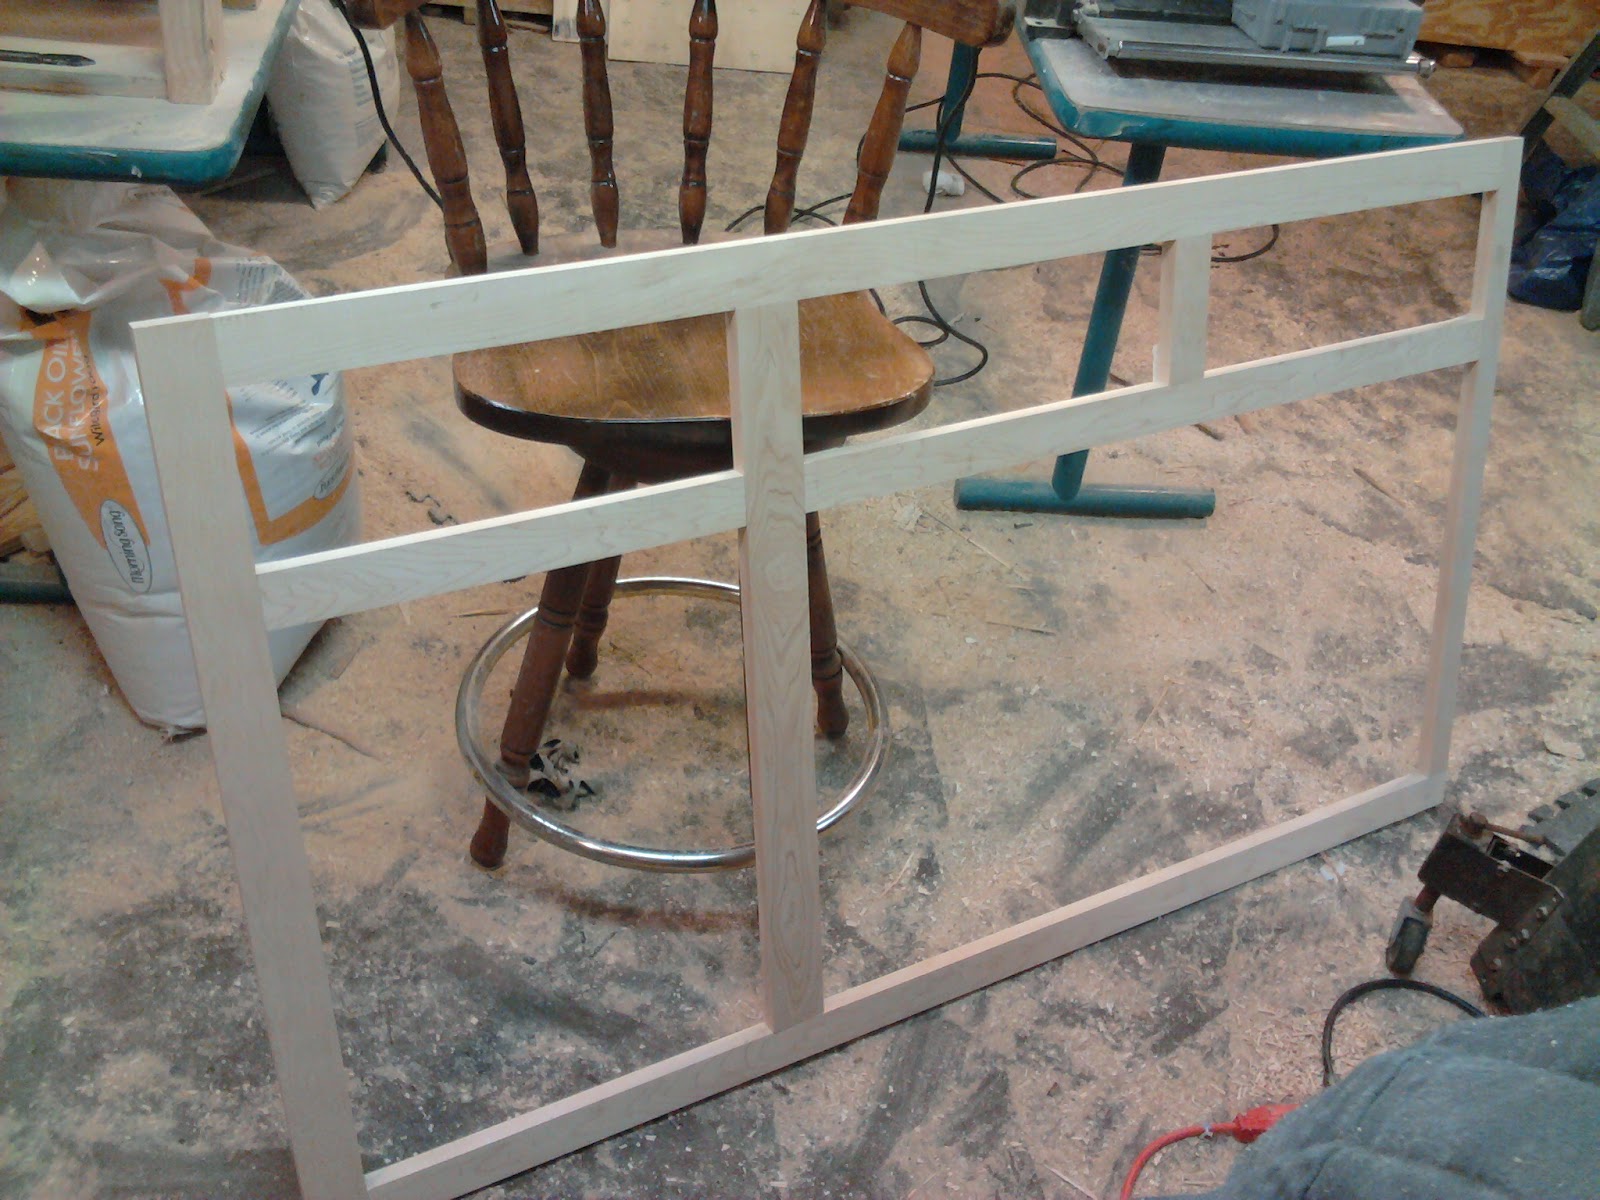
| A whole lotta rails and stiles |
I used a jig to do half-blind dovetails on the drawers. I found a little bit of cheap hickory so I used it as the backer for the drawer fronts. It's super strong and gives a nice contrast.

It seems like I'm glazing over A LOT of work here but it was all really repetitive; rip, joint, cut, join, glue, clamp and sand... So I guess at this point we see some before and after pics.
Before and After
Sink area


New counter and stove
I didn't have any original pictures of this side of the room but there wasn't anything there anyways. Just the fridge next the the window and a table under the window. The fridge stuck out from the wall and was fairly obtrusive and there was no storage at all. Sooner or later I'll install a hood over the stove to vent outside. You'll notice the original hood just recirculated through the kitchen.


Pantry


Last but not least is the soffit I put in. We needed light over the new counter so I decided to do some recessed cans. It works great.


No comments:
Post a Comment