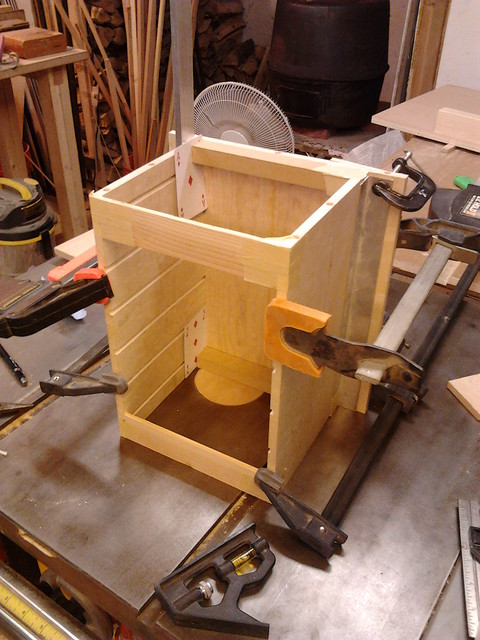
I have the case all cut to size and now have it glued together nice and square. Notice the playing cards shimmed in. Apparently my stock wasn't planed to the exact thickness along the full length of the board that I used for the sides. I went through painstaking effort to get my dado set to a perfect width but I only measured one of the sides. So one of the sides fits perfect and the other is loose. Hence the shims. The sticks at the four corners don't stay, there are just taped in to hold everything square.
Here is the bending form for the doors. It's made out of 3/4 MDF. I drilled pilot holes and all but this crap just loves to split when you sink a screw. The holes are for clamps, which I had to buy more of. darn
 This thing really worked great. One tip i would have is to put something like plastic laminated or wax paper over that front cleat. The glue squeezed out a bit on each door and make it less than a perfectly square surface to register the sheets of plywood to.
The top and bottom are attached to the carcass with dowels. Once I stared spreading glue I realized there wasn't going to be enough work time to do both pieces in the same session. Of course getting in all the dowel holes takes time and because squeeze out in this instance would be a huge pain so I spread the glue on the ends of the carcass very thin. Took a little longer but there's always something to do while the glue dries right?


Today I spend all afternoon working on the drawers. As I said, all the parts were already thicknessed and ripped. They just needed to be cut to length, which I did at the miter saw. I used the TS with a standard blade to do the rabbets on the sides and dadoes for the slides to fit in. I used the TS with the indispensable zero clearance plate to cut the slides themselves.
I measured, laid out, cut, and dry assemble the drawers one by one. This would be opposed to making all the drawers at once assuming they are all identical (which of course they should be and did end up being) I was fairly certain that the dadoes in the case sides were all right but I wasn't taking any chances. I wanted to make sure that they all fit perfectly. Check out my 1/16in shims, three cards thick. The drawers still need bottoms so tomorrow its off to find some 1/8 plywood. To finish the drawers, aside from the bottoms, I'll need to sand all the parts before assembly and glue in the slides. Next comes the false fronts which should take a little time.


I didn't find any 1/8 inch plywood so I just used some 1/4 inch stuff that I had around. It worked just fine.
The Curved Doors


 |
| A little crack in the curve... cleaned up nice |

I only have 4 of the appropriate sized clamps so the top plate was held down with a set of 18in and a set of 30in clamps of the same style. You'll notice I have a small block stuck in between the form and the bar of the clamp. The way the top of the clamp rested in the hole on the form made it want to keep sliding around as I tightened. The blocks helped keep them square. I think a person might want to use a jig saw or something to square off the the tops of the holes in the bending forms.


Finishing Up
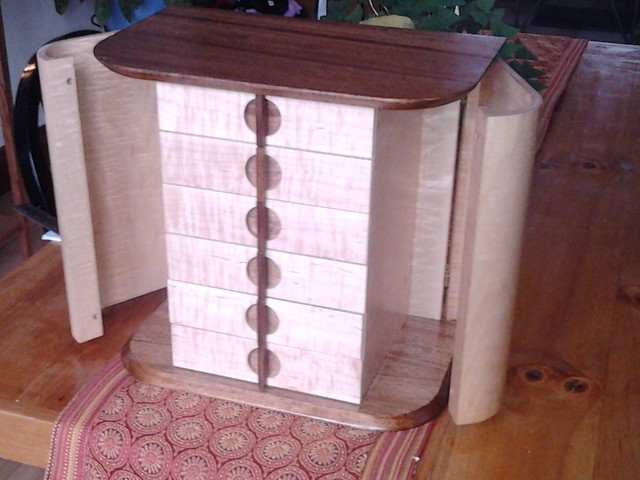
The false drawer fronts are now attached. The contrasting mahog looks great. I also got the slides glued on the drawers. And last but not least, I got the doors cut to final size. There was some tearout on the doors from trimming so I'll get started with the veneer after I get the tearout all filled and sanded.


I got the drawer pulls cut and the dado cut in the false fronts. I have to get the pulls stained before I glue them in. I also got the hinges installed


Finishing Touches
I spent a gloomy afternoon doing some crafting with same batting and velveteen. The drawer inserts turned out great.


I hope everyone enjoys this project. I had a great time building it and learned sooo much along the way. I'm thrilled about how good it turned out and my wife loved it too. It sits in the bedroom on a table that I built a couple of years ago. If you're interested in a more detailed account of the project build I kept an updated a thread on WoodNet forums @ http://www.forums.woodnet.net/ubbthreads/showflat.php?Cat=&Number=5709831&page=&view=&sb=5&o=&fpart=all&vc=1
No comments:
Post a Comment