Sunday, July 26, 2015

Get your motor runnin'

Attention has turned to getting the motor all squared away.  That includes a cleaning, oiling, and rewiring.


Took the motor apart and now I have to figure out what I' doing.


Saturday, July 18, 2015

Bandsaw work continues

The parts for the saw finally came. I got the cool blocks and tension spring installed and threw on the wood slicer resaw blade to give it a try. My God was I impressed!!! Not that i've used a ton of other people's' saws but enough to say that mine is the best one I've ever used. I started with a 3in piece of birch and the saw didn't even know it was cutting anything. Next I tried a 4.5in piece of red oak and the saw still didn't even flinch. The motor didn't slow or bog down at all. I'm so thrilled to have a bandsaw that can handle anything I can throw at it, now I just have to work on best sawing practices. 

My next priority is to get the right pulleys on the thing. I noticed that the saw pulley was wobbling quite a bit. The one on the motor fits very tight and has no wobble at all. Too bad it's not the right one. I know it should have a stepped pulley on the motor but I'm not committed to an exact replacement at this point since I'm strictly a woodworker. I guess my question is whether or not I should be looking for an original part or an aftermarket part that meets the manufacturers specs? Same goes for the pulley for the gearbox. It currently doesn't have anything on the shaft. The first pic is of the pulley off the saw, #5800. Original part or not? It doesn't have a pin (key?) that fits snugly in the slot of the shaft but I'm assuming it should. The second pic is the pulley on the motor which does have that pin and is really stuck on there. You'll notice its pushed up all the way against the motor. I thought tapping it back and forth on the shaft would loosen it up a bit or at least allow me to pull the pin but no dice. Now I'll have to track down a puller to get it off which shouldn't be a big deal. I think auto parts stores lend them out.


Thursday, June 18, 2015

Bandsaw restoration

I spent some time in the shop preparing the saw for the new parts I ordered.  First task was to get the tires off. The top one came off in one piece but the bottom was a different story.  Regardless they both came off relatively easy.  The glue holding them on was a different story.  Lots of mineral spirits, a screwdriver as a scraper and lots of patience.  30-40 minutes later they were both cleaned up and ready for the new urethane tires that should be here next week.  I did find something interesting underneath the tires.  There is a line of holes drilled into both the top and bottom wheel.  My only guess is that it was an attempt to take a bit of weight off to balance them.  It either worked or was a waste of time because the wheels spin beautifully.  I also spent some time cleaning up the table top.  Went through progression from a rag with oil to 80 grit on ROS all the way up to 600 wet/dry by hand.  I was hoping it would have shined up a bit more but i guess I don't need to check for stuff in my teeth on my bandsaw table.


Sunday, June 14, 2015

Vintage Delta Bandsaw

There is a HUGE neighborhood sale in town every year that is a 'must-attend' for me.  Every year I go I come home with something that I've used around the house regularly. With a toddler and another on the way kids clothes were a priority for me this year.  I've seen some planes and other old hand power tools but never a score like this year.

I brought home a 1940's (my guess) Delta wood/metal 14" bandsaw with 5 blades for $70.  It's got an enclosed, cast iron base and is a tank.  There was also the wood only model with an open base for $40 that sold before I could get there.  Other than the wearable parts like thrust bearings, tires and guide blocks the saw is in great shape. It could use a fresh coat of paint but the boards it'll be chewing through don't care how it looks.


motor plaque 

Weird little oil port

model number
The only broken piece

Sunday, February 1, 2015

First steps of construction


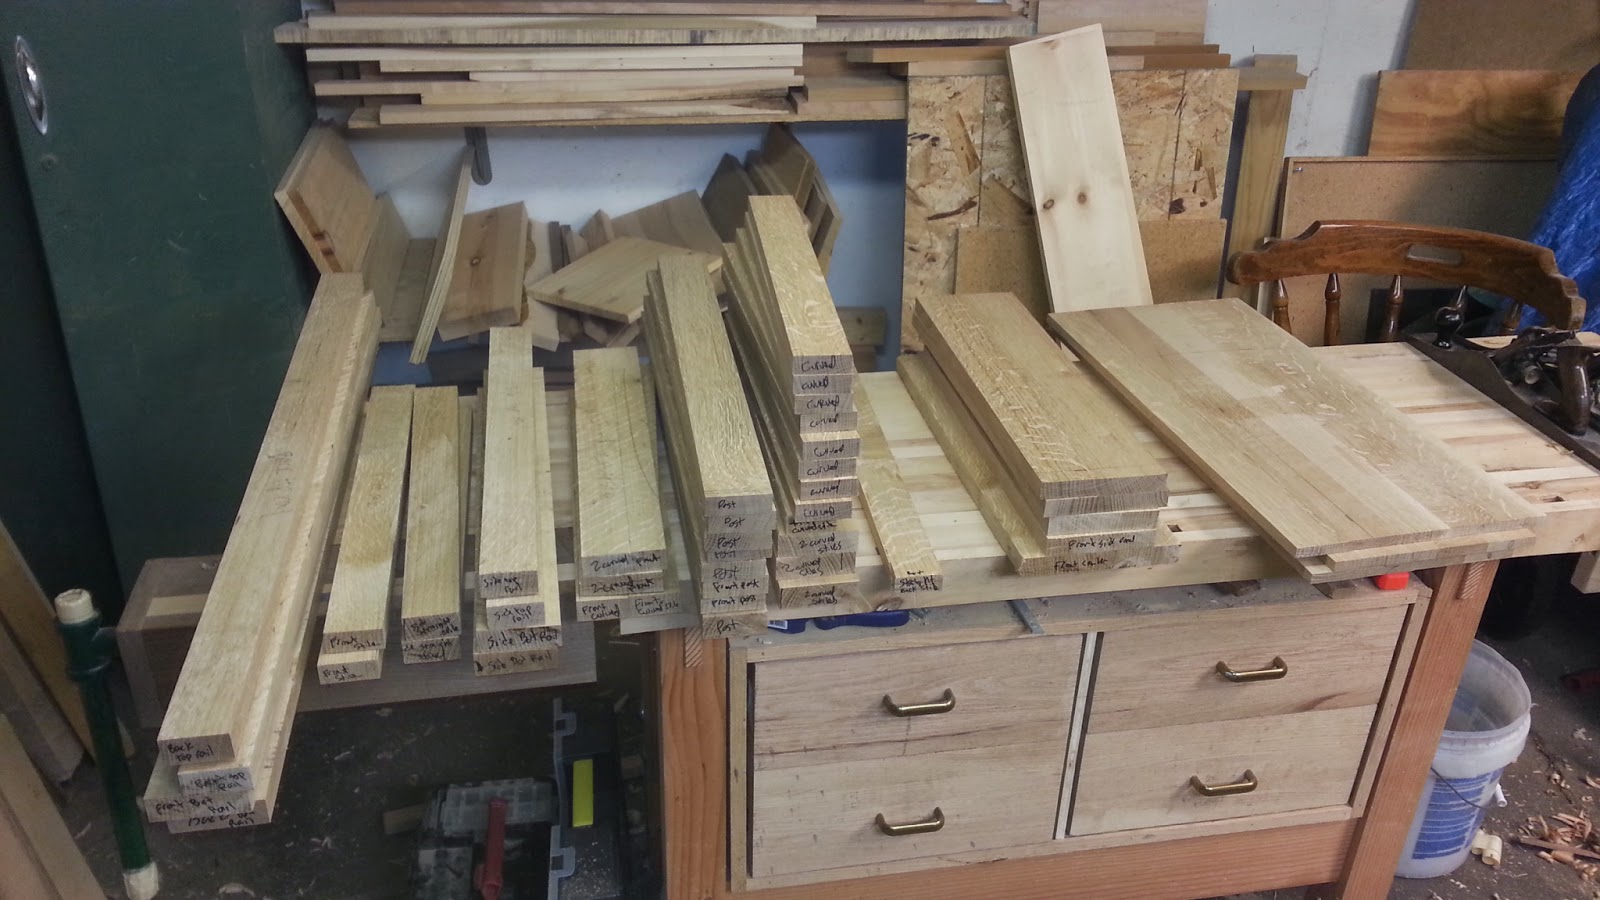
I will save you the mundane details of material preparation but rest assured there was plenty.  It all came from three 12ft 1x8's.  I put painstaking effort into grain match and and prominence of the ray-fleck figure across the whole piece.  What I've got here in the picture is all the rough cut pieces for the chest without the lid, which will end up taking nearly one whole 1x8.


On the corners I used a method to show off the ray fleck on both exposed faces.  Instead of using an 1 1/2in square post, which would have one quarter sawn face and one plain sawn face showing, I mitered two quarter sawn pieces together and reinforced them with a spline.

Mitered corner joint on a chest

I did a test assembly with some scraps around the shop and was feeling good about it.  I took the plunge on the real pieces and didn't have it dialed in just right yet.  It took way too many clamps to get the miter to close up nicely over the whole length. I got it dialed in and the subsequent corners came together nicely.  At this point I'm most concerned about the appearance of the miter because the pieces are still oversized and I'll still have a chance to get all the faces and edges squared up.


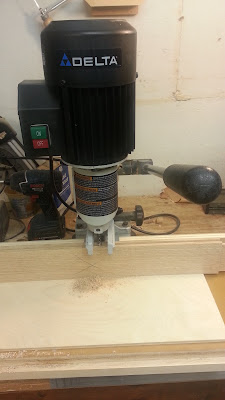
There is a lot of joinery in this chest.  I was happy to have a hollow chisel mortiser and the time it took to whip up this dado sled was well worth it. Having a sled like this is an important tool for repeating cuts.  Set the stop block once, and zip through the 32 or so tenons that need to be cut.  I also cut the curved stiles on the bandsaw and used a router sled and a template bit to finish them up.  


What a time saver!!


Joinery Finished, now on to panels...


With all the joinery cut, it's time to fit this thing together.  After a little fine tuning with the shoulder plane, everything went together nicely.  Also a good time to make a few notes on joints that need to  be cleaned up.


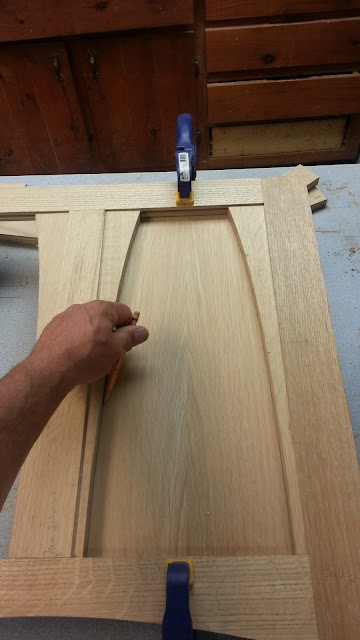
The panels were pretty straight forward.  I resawed some material and sanded it down to about 1/4 in with a wide belt sander.  I got some pretty nice grain pattern but no real fantastic book-match pieces but that's no surprise with quartersawn material.  I dry fit the sides together so I could see the panels in place.  Since they were plenty oversized, I was able to really fine-tune the final look.