Monday, October 29, 2012

some new (to me) planes

I had the chance to visit an antique shop this weekend that has a ton of hand tools.  I have been there once before and must have drooled for at least an hour and walked out with 3 planes.  I had intentions of visiting again this summer but I was very disappointed to find out, as I pulled up to the door, they were closed on Sundays.  I was so excited to make it back this time... but just my luck I was only going to be there on a Sunday. So I thought what the hell, they seemed like a nice old couple, I called up and they were willing to meet me there on Sunday.  I must have thanked them a hundred times and of course left with three more planes.  He charged me $50 for the trio.  It helped out that the hand tool booth belonged to the owners.

The trio

#4

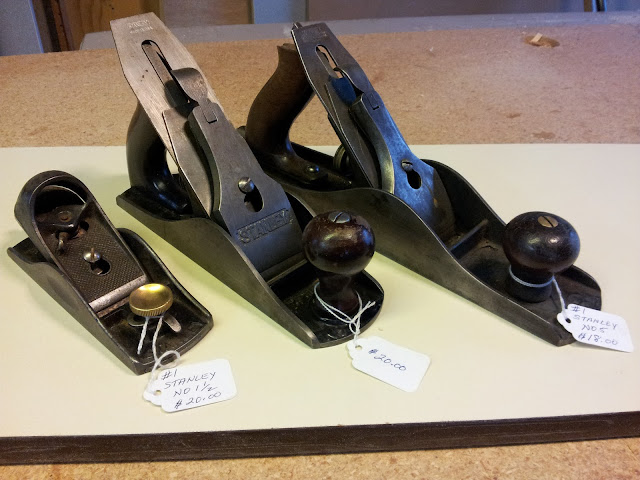
I knew I wanted a block plane for sure and found a nice Stanley #9 1/2.  This is my first block plane so I've got some practice ahead.  There's a little bit of cleanup to do but it's in good working shape.  I was kinda looking for a #3 but ended up with another #4 instead.  The thing is practically new.  The last grab was a #5.  I already have one of these too but its my favorite so I'm sure a second one will get used.  The one I already have is made in England and on comparison is a bit heftier. Oh and the new one needs a new back tote but is in otherwise good shape.


#5

Broken handle

Add caption
Here's some comparison shots of of the new and old (relatively speaking).


Stanley is new, Wards Master is old.

Wards Masters has the red frog and big brass knob

Made in England has the chrome cap and adjustment knob

The frogs have a few very notable differences 

 Made in England has a couple extra ribs behind the rear tote for added rigidity I guess. 

Wednesday, September 26, 2012

Work on the bench top

Since the last update I've gotten the top almost done.  As you can see its all glued up into the final two pieces.  It started out as three small slabs, two long ones and the short one seen here.  Well, it actually started out as about two dozen boards but I'd rather forget about that pain in the ass.  If I were to do it again I would start with much thicker boards and cut that down to 8-10 boards.  This was by far the largest glue up I've ever done and what a pain.  There was lots of planing to do just to flatten it enough to glue the two long sections together.  I did the majority of the flattening with the hand plane because my planer set-up isn't really beefy enough to handle these slabs of hard maple.  My jointer can't handle these slabs either so I was forced to fine tune the faces of the slabs with a hand plane to get a perfect fit for the glue up.


Besides the slab, I've also been working on the tail vise.  I had the core all built up already so it was just a matter of mounting things to the bench.  I had to add a block on the underside to support the vice plate and then mount the plate.  Can anybody tell me what the last two holes on the plate are for?  The other ones are all counter sunk but the last two aren't.  Right now I'm farting around with things now just to get everything fitting tight and square and making sure the doghole strip lines up nice.  


Tuesday, September 25, 2012

Excuse my absence

Well, as all new parents know free time is a thing of the past ... at least for the first 6 months.  My time in the shop is quite limited now but I do still squeeze in an hour here and there.  I'm still working on the workbench and not much else.  There are some Christmas gifts that I should figure out and a dresser for our 'Little Peanut'.  I really wanted to do a crib but there's not way I'll have time before she grows out of the cradle, which is working fantastically.  My next big project will probably be a dresser for the nursery.

Tuesday, July 3, 2012

More cradle pictures

A neat little defect I worked into the stretcher cap. 
Closeup of the joinery. 

Another "defect" that I worked in.  I had to fill the gap on this know with some superglue.

It was a real pain in the butt to get these spacers fine tuned.  I'm really happy how well it turned out.

The top stile on one of the sides has some beautiful quartersawn grain.  I'm really happy how the finishing regime popped the grain.  

I just went with an unfinished pine bottom.  I did put a layer of poly on it for some protection.  

Sunday, June 24, 2012

The forest restoration project has started and halted

Crews started planting trees for the project last week.  Its finally happened.  Monday morning they planted about 200 trees and prepped for some more.  We were in contact with our partners at the zoo to get materials hauled up the hill to the site on Wednesday, but something happened on that Tuesday that no one here in Duluth will forget anytime soon.  The sky opened up and unleashed an epic rain that, as I've been told, only happens once in 500 years.  As it happens, the stream which gives the project its name burst forth from its banks devastating every path up the hill.  If you think devastating is an exaggeration just look at this.


This used to be an ATV trail, now its an 8 foot deep 15 foot wide washout.


As you can guess by  the boardwalk and railing, you used to be able to walk onto this bridge.  There used to be a path there with lots of earth under it.  This is where all the water got out and its hard to tell by pictures but the second river created by this was almost as big as the regular one.

With obstacles like these it's obviously impossible to get any machinery up there and its not very feasible to carry thousands of pounds of fence up.  There are other ways up the hill but they are now all impassable with washouts.  I wish I would have budgeted for a helicopter.

The Cradle is FINISHED!!!!

It's been a long time since a post but I've been one busy dude.  There gets to be so much to do in the spring when the weather finally gets nice.  It makes it especially tough to spend the roughly 10 hours in the basement doing all the finishing.  Here's the lineup of parts all ready for the business.  Of course I already started a few coats of finish on the panels.


The first step was to rub everything down with a coat of boiled linseed oil.  It really did a nice job of bringing out the grain detail and gives it a great, warm color.  As I was sanding each piece I was conscious to put the finished pieces in the dark.  Cherry has a tendency to darken in the sunlight so keeping them in the dark after sanding ensured that they would all be the same shade when it was time to finish.  Earlier in the project I noticed it only took a couple of hours after a sanding for the wood to start changing colors.  

After the linseed oil was good and dry it was time for the many, many coats of shellac.  I cut the shellac half and half with denatured alcohol.  This consistency of  shellac goes on easy and dries in minutes.  I just used a folded up rag to apply it.  With the size of these pieces I was able to do three consecutive coats on each one.  All those slats on the sides were a real chore.  Once the first three coats were on it was time to sand everything, again.  A quick pass with some 240 grit and back to the basement for the next couple of coats of shellac.  Then, of course, more sanding with the 240 before the final coats of varnish.  Here's the lineup after the first round of shellac.  It looks pretty much the same as when it's all done.  


The final coat was varnish cut half and half with mineral spirits.  Same idea as the cut shellac but it takes a little longer to dry; about and hour.  It's a forgiving finish.  It dries smooth with some subtle streaks.  Those streaks are taken care of in the last step, steel wool.  I rubbed the hell out of the thing with  0000# steel wool to give it a glass smooth, clear but not to shiny finish.  I've used this method before without the steel wool and now regret it.  It really gives it a finishing touch.  

So now the big moment!!!


TA DA!!!!

I wish I knew how to do some cool animation here or something.  I'll have to get some more closeups and angle shots and post them.  I've gotten to know this project very well since I stared and I've come to appreciate some details that deserve more picture.  So as satisfying as it was to get together I still wasn't quite done.  It was terribly squeaky, so I had to address the dowels it swings on.  I farted around on these for  awhile.  I sanded them and rubbed them with wax but it just wasn't getting it done.  A couple of google searches later and I had a great idea.  Cut flutes into the dowel to reduce the amount of wood rubbing and give the wax a place to hang out.   Now it works splendidly.  I'm expecting the button plugs for the ends shortly and it'll be showroom ready.


Sunday, June 10, 2012

I think I remember starting a workbench

With the work on the cradle coming to an end I'm able to focus some attention on the workbench I started quite some time ago.  I still have a lot of work to do on making the tail vise assembly, but in the mean time I can get the top slab glued up and mounted on the base.
After spending considerable time staring at the two sets of plans, it finally clicked and I build the jig for making dogholes.  It was quite simple once I got going with it.  


I didn't have the ideal router bit for the job so I had to use a combination of my two routers.  I used a 5/8 straight bit with a collar on the big router to clear out most of the material.  Then I used a top bearing, 3/8 straight bit in the Dewalt to ride along the jig and clean things up.

Saturday, May 26, 2012

Long overdue Cradle update

Work has been progressing slowly and steadily for the last couple of weeks.  I've been working on putting a garden in and have been getting some overtime at work so my time has been spread a little thin lately.  Its crazy how busy a person can get with all things yard work when these long, warm spring days show up.  


There's been plenty of sanding going on and some glue-ups.  The end panels are done, with the center panel prefinished.  I just think its easier and you get better results finishing frame and panels this way.  The panel was just a little undersized so I used a simple trick to get it to fit tight.  You just lay out a bead of silicone caulk on some wax paper, and when it dries cut it into small pieces and put them in the grove.  Depending on the fit of the panel you can make the bead of caulk thick or thin.  Another nice thing about this fix is that it keeps the panel from rattling in the frame.  With the ends all glued up it was time to assemble the basket.  Since the whole thing is meant to break-down, the basket is screwed together and the screw holes concealed with plugs.  I'll spare you the details of laying out the holes and getting the sides attached, needless to say it was meticulous and took longer that it probably should have.  


I guess I should probably back up a bit.  Before the basket went together some holes needed to be drilled in the ends for the dowels it will rock on.  I was very nervous about this step.  I was worried these measurements wouldn't be the same and the holes wouldn't line up but I was VERY relieved to find out everything measured perfectly down to the mm.  Alright, now that the basket is assembled, with holes, It was time to get the legs and stretcher assembly finished off.  As it was, the cradle fit between the uprights with about 3/4 inch to spare.  I found some scraps that were 3/8 inch and make the spacers that fit between the upright and the basket.  


Now that it was determined that the stretcher and uprights were all at their final size it was time to make the wedges for the ends of the stretcher.   It was pretty simple. The one tip I'd offer here is to drill the hole for the finger catch before you cut out the wedge on the band saw. 


Another anxious moment was getting the holes drilled into the tops of the uprights for the swinging dowel.  Again I was worried about measurements not matching up but again I was VERY relieved that they both measured identically.  So with the holes all drilled and sanded smooth and a dowel also sanded nice and smooth I faced the moment of truth:  will it rock smoothly?!?!  YES!!!!!!!!!!!!!!  Once it was all together it worked perfectly!!!!!!!!!  A common adage in woodworking is that as you reach final assembly of a piece your dealing with the accumulation of errors that occurred along the way.  This is the idea that a handful of small mistakes can add up and lead to a one big headache.  With this project having many new concepts to me and having two separate assemblies I was very concerned about things not working out.  This is especially poignant with the pivot point for the rocking to work in this case.  When everything worked as it should it was a huge relief for me and a very satisfying feeling as well.  


We're really down to the home stretch now.  Just a few more small construction details and the finishing.  


Friday, May 4, 2012

The cradle has taken shape!

The last session in the shop really came together with some exciting results:

-The end posts are done, complete with mortise for the wedged mortise and tenon joint.  

-The stretcher is almost complete. I still need to put a cap on it that will add some decoration and strengthen the joints.  

-I've been fine tuning the joinery, as I go, with my new shoulder plane.  I'm so happy I finally got one of these planes.  


After getting butterflies in my stomach from looking at this thing held together with clamps I had to take it all apart, again.  I am going to finish the end panels before I fully assemble the frame so I started sanding them.  Its mostly small details left on the construction part but there's still plenty of sanding and finishing to go... Oh and don't forget the roundovers.   I've got some ideas for finish that I hope to try on some scraps this weekend.   I would love it if I could start applying finish next week.  


Monday, April 30, 2012

new arrivals

I was on a walk today with the dogs and took notice of a few new arrivals.  Actually I heard a house wren before I went for a walk, as I was working in the shop this morning.  There is usually a nesting pair in the little patch of woods in our alley.  On the walk I heard a chipping sparrow in the distance.  I heard more that one during the walk but not very many.  This must be the first few of the year.  I also saw and heard some brown headed cowbirds.  There was a song that I was hearing in the distance that I just wasn't able to put my finger on.  I was thinking it was a cardinal at first but then moved on to thinking catbird or brown thrasher.  Thrashers have been reported in Duluth already so that would be a reasonable guess.  I'm thinking its still a little bit early for catbirds.  I've been asked again to be a leader at Boulder Birding  Big Day in a couple of weeks so I best be getting out and doing some bird watching to refresh my memory on songs and keep track of the new arrivals.

The Cradle is starting to take shape

I finished fine tuning and fitting all the slats for the sides this morning.  Its funny, I spent all that time fitting them in nice and snug and then lining them all up to get the sides dry fit and assembled and now I have to take it all apart to finish sanding, roundover, and possibly finish the slats.  I haven't decided on what, if any, parts I'm going to prefinish before assembly.  For that matter I haven't even decided what I'm going to use for a finish.  Maybe a couple thinned coats of shellac and then varnish?  This will be my first project in cherry so I'm open to suggestions.  


Once I got both sides fit together I couldn't resist putting them in  place.  Nothing is fastened yet, it's just held with a couple of clamps but it was still exciting to see.  My wife was ecstatic to see some progress that moved towards finished form.   


I also spent some time working on the mortises on the legs that will fit into the feet.  I realized I should have cut them to thickness before I cut the curves because now I don't have a square surface to register on the miter fence.  It's not a really big deal, just going to take a little more setup to get things squared up and held tight.  Some of the next steps on the basket assembly will include fine tuning the joinery and trimming any proud ends, putting a radius on the corners of the end panel frames, fastening the sides to the ends, and putting a slight roundover on all the edges.  I'll also need to get the legs and feet put together and build the lower stretcher.   A couple more good sessions on this baby and I'll be on to finish sanding.  


Friday, April 27, 2012

Slow and steady

Progress on the cradle continues... slowly and steadily.  I know I said I was going to post some pictures of the process of cutting out the side supports, but I guess I lied.  I was so excited when the router bit came and was under the gun before work, I just plum forgot to snap any pics.  You'll just have to trust me that it worked great and they turned out great.  See for yourselves.  My wife laughed at me, but I find the sweeping curve and that hip at the top very pleasing, and dare I say sexy.?.?  Hopefully once the whole thing is assembled they won't be overtaken or out of place with any other elements.  

My current task is getting the sides done.  It is a very slow and painstaking process.  I had to cut about 50 little pieces to fill the grove between the slats.  It would seem like one size should fit all but unfortunately that's not the case.  My router table setup leaves a little to be desired when it comes to repeatability of a cut after an adjustment.  It's a combination of the insert plate and the lack of precision between the motor and the base.  One of my next purchases really should be an aluminum plate with a router lift.  With that said, I did get the pieces all fit and glued.  I made an effort to match grain pattern to make them inconspicuous but I could only do so much.  At this point I need to get all the slats cut to length and fit in the rails.  I'll have to decide if there is any particular arrangement that will give a pleasing look.  I have a feeling that they'll just be random.  Once I have these sides done it'll be time to start some dry assembly.  


Thursday, April 19, 2012

Cradle? Oh yeah I'm building a cradle.

It's has been quite awhile since I last posted an update on the cradle for our brewing baby.  I was stalling on some parts until I could use a good band saw and milling the lumber for the workbench pretty much tied up the shop for awhile.  The bench top is all milled and on hold for now and I finally got a chance to visit a fellow woodworkers shop for a little tool time.  I got the feet cut and sanded and the curves on the end support cut out.  I only did 1 of 4 cuts on the supports but I have a good plan for the rest that will make them identical.  Using a flush-trim/pattern bit in the router I will use the already finished support as a template.  I'll cut one side of the second support, flip it over and use it to cut out the second side of the first support.  It sounds more complicated than it will be.  I'll post some pics once I get underway with it.  I had to order a a longer bit so it'll be a few days.  


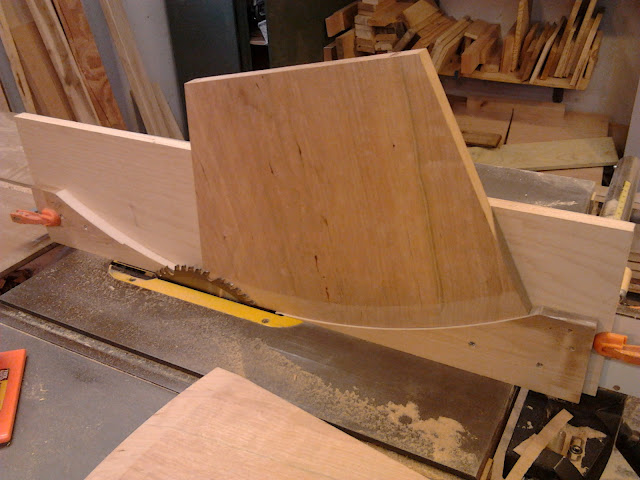
I also spent quite a bit of time on the end panels.  It was a little stressful but I got the chamfers all cut,  the curved one was the scariest.  I was worried about it being wavy because neither the jig nor panel was sanded smooth.  It just came to me one day to use one to sand the other and vice versa.  I stuck some sand paper to the curved edge of the panel and sanded the jig.  Once the jig was nice and smooth (and free of the waves that a spindle sanded will leave when you're new at it) I used it to sand the panels. Another nice thing about this method is that the curves end up being identical.  Here's the jig i used per the specs in the plans.


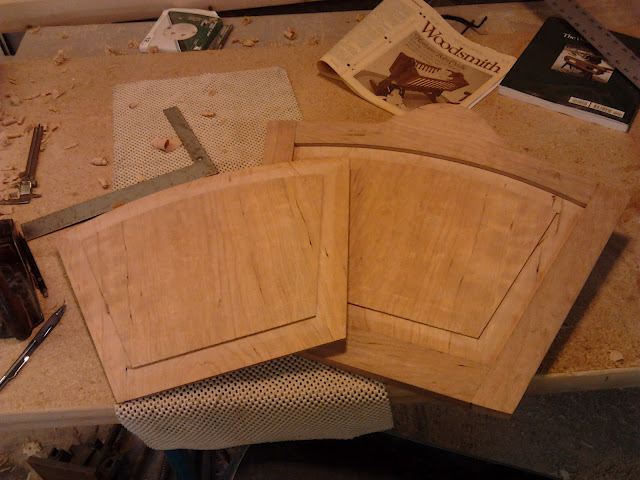
As I said, I was really nervous about this but It couldn't have worked better.  Everything slid smoothly and I just snuck up on the thickness.  Doing the other 3 sides was a breeze after this.  The next, and time consuming, step was to fit the panels nicely into the frames.  I had to lots of fine tuning with my smoothing plane and sandpaper on the bevels but all is well.  I'm very happy I decided to go with the raised panels for then ends.  They look so much better than a solid panel.  


Besides the end supports, the next step is more work on the sides.  I have to cut all the little filler pieces to go in the groves between the slats.  


Friday, April 6, 2012

Duluth Audubon Society Grant

I got some great news this week about a grant proposal I wrote for the Duluth Audubon.  The DNR decide it was worth funding.  It is approximately $13,000 to start restoring a section of forest here in Duluth, along the Kingsbury Creek.  This is such an exciting opportunity for the DAS to get involved in some "on the ground" work in conservation and for myself as an aspiring grant writer.  The project is going to be a lot of work but I think I assembled a great team of collaborators that will make it go smoothly.  I will go into more detail and post lots of updates here as the project progresses.  Right now I'm just waiting for more info from the DNR about the next step.   Here's the grant narrative to give an idea of what's going on.  


KINGSBURY CREEK FOREST RESTORATION NARRATIVE


PROBLEM STATEMENT

The presences of appropriate native forests on hillsides and along drainages help to perform a myriad of ecosystem services. These services include improving water quality, supporting wildlife habitat, mitigating erosion, and even slowing climate change. In order to ensure a healthy environment for years to come, these ecosystem services should be addressed and restored whenever possible.  The landscape around the lower stretches of Kingsbury Creek is an area in which these services have been greatly diminished.  Natural regeneration of key plant species is almost absent due to past disturbances, lack of parental stock, competition from nonnative vegetation, and browse pressure from deer. These factors are why key species such as white pine, red pine and cedar are lacking from the landscape.  The first and most prominent need of this project is a native, diverse tree community which can perform valuable ecosystem services. 

A second need of the project is to address the water quality of Kingsbury Creek.  The creek is a designated trout stream but according to the Stream Management Plan (DNR Fisheries, 2011) the water regularly reaches temperatures stressful to brook trout that are stocked yearly.  In fact, the MN Pollution Control Agency recently announced that Kingsbury Creek has been added to the State of Minnesota list of impaired waters due to lack of macro-invertebrate and fish assemblages.  The lack of tree cover to slow rainfall and snowmelt contributes to increased erosion and resulting sedimentation. These factors negatively affect habitat in the stream and at the mouth in the St. Louis River estuary, which is a US Environmental Protection Agency Area of Concern.  The mouth of the creek, according to the Stream Management Plan (2011), could be used as a quality nursing and spawning area for fish in the estuary if sedimentation were reduced.         

Finally, this proposal addresses the needs of the future.  There are many more acres in the adjacent landscape that are disturbed and suffering from reduced ecosystem services.  This land is all under public ownership and could potentially be restored to a more native forest type.  In order to keep this and future projects a permanent part of the landscape, Duluth has a Natural Areas Program that can grant permanent easement status to parcels of land.  To gain protection for this project and to expand it to the rest of the area, a long range management plan must be developed.  As this and future restorations take shape it is important to educate the community about restoration efforts and why they are necessary.  The education department at the Lake Superior Zoo will develop a program that addresses subjects such as basic forestry and wildlife principles in the context of a restored forest.  Finally, in order to follow the progress and effects of the restoration, biological surveys need to be established.  These will include breeding bird surveys, vegetative survival and regeneration surveys, and water quality analysis.


OBJECTIVES

The main objective of the proposal is to begin restoring ecosystem services to the lower reach of Kingsbury Creek. The Duluth Stream Corps will perform all the site preparation and planting. A variety of trees that closely resemble a native forest will be established.  Species will also be planted that will ensure the restored forest is prepared for the predicted climate change and to increase diversity and wildlife benefits.  In addition to the already present paper birch and aspen, historically native species to be planted include white pine, red pine, northern white cedar, white spruce, and yellow birch.  This conifer component is significant for reasons such as thermal cover, slowing rainfall, and creating wildlife habitat.  Thirty five Species in Greatest Conservation Need are found in this type of forest.  Of these 35 species, 20% are considered specialists, meaning they use two or less habitats.  Transitional species such as red oak and eastern hemlock will be planted to diversify the forest and ensure its viability in the event of a warmer climate.  A diverse stand of tree species and ages provide more habitat opportunities for a greater number of wildlife species.  The diversity also makes the forest more able to survive pest or disease outbreaks without significantly diminishing its benefits to the landscape. 

Another objective is to improve the water quality in Kingsbury Creek.  This will be achieved mostly as a by-product of the overall planting.  There will be a specific effort to plant appropriate species directly in the riparian zone to shade the stream from solar radiation and reinforce stream banks.  The plantings in the adjacent landscape will also help water quality by slowing runoff from heavy rain events and spring melt.  Overall, this should result in lower water temperatures and less erosion and sedimentation. 

The final objective is to ensure that restoration of the sensitive landscape will be permanently protected, monitored, and used to educate the community.  Input from qualified professionals will be sought to develop a long range management plan so the land can be protected under the Duluth Natural Areas program.  Professionally accepted survey protocols will be used to survey planting health and survival as well as to monitor the changing bird and wildlife community.  The education staff at the Lake Superior Zoo will develop programs for all ages to educate the community about basic forestry and wildlife principles in the context of a restored forest. 


Another overall objective of the project is to contribute to the further rehabilitation of the St. Louis River estuary and the surrounding upland habitat.   Some past successes include work by the DNR and EPA to restore habitat and clean up the legacy of the harbor’s industrial past.  The river and estuary are important to this community for many reasons, not the least of which is for wildlife.  Its importance to birds was recently recognized by Minnesota Audubon Society as one of the state’s newest Important Bird Areas.  This project can be one of many more future efforts to rehabilitate this valuable landscape.


METHODS
Tree species to be planted will include conifer species and deciduous species. Trees will be planted at a density of 100-200 trees/acre, depending on site conditions and current vegetative cover. Site preparation will consist of clearing an area with either a brush cutter or weed whip. In most sites, a 3`-5` diameter area of vegetation will be cleared down to within 1`` of the ground. In some areas, a larger diameter area (up to 10`) will be cleared to remove competition from woody species such as honeysuckle, buckthorn, hazel, or alder. 
Trees planted will be sourced from local nurseries and in most cases will be containerized seedlings. A weed mat is placed around the seedling and anchored using ground staples. Weed mats serve to eliminate competition immediately around the trees and help prevent soil water loss through evaporation.
In order to deter predation from white-tailed deer and rabbits, cages will be installed around white pine and white cedar. Cages are made from 6` high welded wire fencing and are 3` in diameter. The dimensions were chosen with advice from forest management professionals from the Natural Resources Research Institute, South St. Louis County Soil and Water Conservation District, and MN DNR. Cages are secured with a 6` t-post, a 1` lawn edge stake and 3 fencing clips.  Marginally susceptible trees such as red pine will be bud capped in the fall to deter browse. 
Deciduous trees generally need to be protected from mice and vole predation, in addition to deer.  Vented tree tubes will be installed to maximize survival. Tree tubes are 5` in height and are secured using an oak stake. Tree tubes include a bird net stretched over the top to discourage nesting.
Development of the long range management plan as well as performance of the vegetation and wildlife surveys will be contracted to a qualified and experienced professional from the community. 
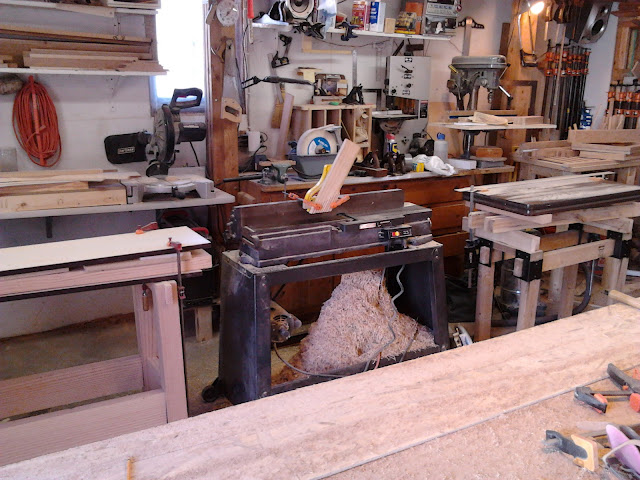
The jointer is TIRED!!

That pile of lumber has now been turned into row of nicely jointed and planed boards that is starting to resemble a benchtop.  It was no easy task running those long boards over my 6in jointer.  I tried a few times in vain to run the full board over before I came to my senses.  I was just too excited to get started i guess.  The first thing i realized is that I should rip the boards down to a near-finish width.  This both makes it more manageable on the jointer and it gives the effect of a flatter board.  The circular saw did just fine for the ripping.  My next challenge was to support the ends of the board on the infeed and outfeed sides of the jointer.  This was easily enough accomplished but lots of screwing around getting them both level and flat with the jointer bed.   And finally, I needed to keep the boards flat on the outfeed side of the jointer.  I started with one feather board clamped to the fence but soon realized I needed to spread the downward pressure across more of the board so I stacked a couple of feather boards.  It was quite the setup but it worked.  
a serious hill of shavings!!


All of the boards planed down nicely but some of them are even less that an inch think after getting them milled flat.  Oh well, nothing a gallon of titebond won't take care of.  I stared to edge joint on the machine but again realized the boards were just tool long for my small jointer. It looks like I have a few more hours of jointing by hand!!  I just picked up some 800 and 1100 grit sandpaper so my plane blade will be honed to a mirror and make easy work of these narrow boards.  

Thursday, March 29, 2012

WHOA Lumber!!!

Well I finally got the lumber for the bench top and I think I got more than I need.  Its all pretty rough so I have a lot of work ahead of me to get it all squared up and ready for glue.  It looks like most of the boards are going to take a combination of methods to achieve flatness.  I'll probably get after them with the jack plane to knock down the real high spots, then head to the power jointer, and then the power planer.  


I also got my used bench vice from the same place as the wood.  It's a little tough looking but I think I can get it freshened up nice.  The tail vice also came in the mail from Lee Valley yesterday.  It's been an exciting week.  I now have everything I need to complete the workbench.  Next week I start working nights so I'll have all day in the shop so hopefully this work will get done in short order.  It all depends on how my hands and wrists hold up.  For some reason running boards over the jointer always gave me a hard time.  


The plan for the upcoming week is to finish the base with the draw bolts I picked up yesterday.  They are 8in long and 3/8in round.  Getting the boards milled for the top will be an ongoing thing while I fit in some work on the cradle as well.